
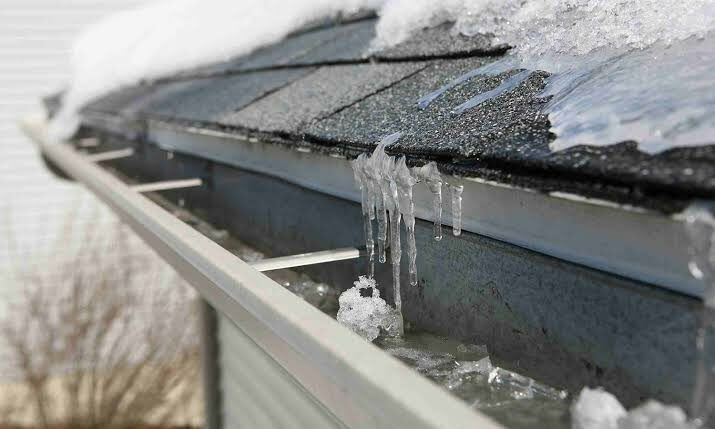
The thick ridges of ice dams Minneapolis homeowners find along their eaves every winter are almost always caused by heat escaping from the house into the attic. That heat melts the snow on the upper roof, the water runs down to the colder roof edge, and it refreezes into a dam that traps more meltwater behind it. Short term, you can reduce the risk by raking snow off the lower roof from the ground. Long term, the fix is air sealing and insulating the attic so the roof stays cold.
This guide explains why ice dams are so common in the Twin Cities, how to spot one early, what to do (and not do) when you have one, and how to prevent them for good. The guidance draws on University of Minnesota Extension recommendations and Minneapolis building rules.
In this article
- What Is an Ice Dam and How Does It Form?
- Why Ice Dams Are So Common in Minneapolis
- Warning Signs of an Ice Dam
- What Damage Can Ice Dams Cause?
- What to Do Right Now If You Have an Ice Dam
- Ice Dam Removal: DIY Options vs. Hiring a Pro
- Ice Dam Prevention: Fixing the Real Cause
- Do Heat Cables Prevent Ice Dams?
- When to Call a Roofing Professional
- Frequently Asked Questions
What Is an Ice Dam and How Does It Form?
An ice dam is a ridge of ice that builds up at the lower edge of a sloped roof, usually right above the gutters. It holds back meltwater, and that pooled water can work its way under shingles and into the house.
According to University of Minnesota Extension, three conditions have to line up at the same time:
- Snow on the roof. No snow, no ice dam.
- A warm upper roof. Higher parts of the roof’s outside surface are above 32°F, so the bottom layer of snow melts.
- A cold lower roof. The roof edge (the eave, which hangs past the heated walls) stays below 32°F, so the meltwater freezes there.
The heat that warms the upper roof comes mostly from the house itself. Extension notes that the main driver is warm indoor air leaking into the attic, not sunshine. That’s why two houses on the same street, with the same snow, can look completely different: one has a clean roof edge and the other has a wall of ice.
Why the problem keeps growing
Once a small ridge of ice forms, every bit of new meltwater has nowhere to go. It backs up behind the dam, some of it freezes, and the dam gets taller. On a cold, sunny stretch with a heated attic, this cycle can repeat every day.
Why Ice Dams Are So Common in Minneapolis
Minneapolis has nearly every ingredient for ice dams: long stretches of below-freezing weather, snow that stays on roofs for weeks, and a large stock of older homes that were built before modern insulation and air sealing.
Older homes and story-and-a-half houses
A University of Minnesota Extension fact sheet on Minnesota ice dams points out that many homes from before the 1930s were built with little or no insulation. Many have been updated since, but upgrades are often patchy.
Story-and-a-half homes, which are common across Minneapolis neighborhoods, are especially prone to ice dams. The Center for Energy and Environment (a Minneapolis nonprofit) explains that the upstairs ceiling sits close to the roof, leaving very little room for insulation. Air sealing and insulating where possible helps, but in some of these homes it may not fully stop ice dams.
Hidden heat sources in the attic
Extension lists several features that raise the risk because they leak heat or warm air into the attic:
- Chimneys and the gaps around them
- Leaky heating ducts or ductwork running through the attic
- Knee wall spaces (the short walls in finished upper floors)
- Recessed “can” lights in the top-floor ceiling
- Skylights
- Complex roofs with valleys, dormers and multiple levels
Bathroom and kitchen exhaust fans that dump warm, moist air into the attic instead of outdoors make things worse, and Extension notes that exhaust vents that end just above the roof may need to be extended in heavy-snow areas.
Warning Signs of an Ice Dam
Catching an ice dam early gives you more options and less damage. Check your house after every big snow and during the first warm-up that follows.
- A thick ridge of ice along the roof edge or in the gutters. Look for ice that sits on the shingles above the gutter, not just in it.
- Large icicles. Travelers, the insurer, notes that icicles can be a precursor to ice dams. They are also a falling hazard over doors and walkways.
- Water stains or damp spots on ceilings near exterior walls, around window frames, or on the upper part of exterior walls.
- Peeling paint, bubbling drywall or wet insulation near the eaves.
- Frost or moisture in the attic, often a sign that warm, moist house air is leaking in.
- Bare patches on a snowy roof while the neighbors’ roofs are still white. That melting usually traces back to heat escaping through the ceiling below.
What Damage Can Ice Dams Cause?
The ice itself isn’t the main problem. The water trapped behind it is. Shingles are designed to shed water running downhill, not to hold back a standing pool, so water can seep up under them and leak into the roof deck, walls and ceilings.
Common results include:
- Stained or sagging ceilings and damaged drywall
- Soaked attic insulation, which loses much of its insulating value when wet
- Rotting roof decking, fascia and soffits
- Peeling paint and damaged siding
- Gutters pulled loose by the weight of ice
- Mold and mildew, which University of Minnesota Extension warns can follow ice dam leaks if wet areas aren’t dried out
Doesn’t my roof have an ice barrier?
Newer roofs in Minneapolis should. Because Minnesota’s climate is considered severe, the City of Minneapolis requires an ice barrier on re-roofs of homes. It must run from the eave edge to a point at least 24 inches inside the exterior wall line, and it is usually a self-adhering polymer-modified bitumen membrane.
That membrane is a valuable backup, but it isn’t a cure. If a dam grows tall enough that water backs up past the protected strip, or the roof is old enough to predate the requirement, leaks can still happen. The real solution is still to stop the dam from forming.
What to Do Right Now If You Have an Ice Dam
Safety comes first. Never climb onto a snowy or icy roof, and avoid ladders in winter conditions. The Center for Energy and Environment puts it simply: climbing up to break up an ice dam is not worth the risk. University of Minnesota Extension also warns that anyone working on a winter roof, or on it from below, risks injury and damage to the house.
1. Rake snow off the lower roof from the ground
Removing snow cuts off the supply of meltwater. Use a long-handled roof rake while standing on the ground, clearing the lowest part of the roof first. Travelers suggests clearing roughly 3 to 4 feet up from the roof edge.
Extension cautions that raking can damage roofing materials, so pull gently and don’t scrape down to the shingles. Keep well away from overhead power lines, especially with a metal rake. For a full walkthrough, our roof snow removal page covers when it’s worth having a crew clear the roof instead.
2. Melt a drainage channel (only if it can be done safely)
Travelers recommends filling a nylon stocking with calcium chloride ice melt and laying it vertically across the dam so it melts a channel for water to drain. Use calcium chloride only; rock salt (sodium chloride) can damage the roof. Cover shrubs and plants below, because the runoff can harm them.
The catch is that the stocking has to be placed on the roof. If you can’t do that from the ground without a ladder on icy footing, leave it to a professional.
In an emergency, University of Minnesota Extension describes using tap water on a warm day to cut channels through the dam, working upward from the lower edge. It stresses that these channels stop working within days, so they buy time but don’t solve anything.
3. Manage leaks inside
- Put buckets and towels under drips and move furniture, rugs and electronics out of the way.
- If a ceiling is bulging with water, keep people out from underneath it.
- Take photos of the ice dam and any interior damage for your records and any insurance claim.
- Dry wet areas right away. Extension advises drying damp materials immediately to prevent mold, and waiting until ceilings and walls are fully dry before repairing them.
If water is actively coming through a ceiling or a wall, treat it as urgent. See our emergency roof repair page for what a crew can do to stop the water.
What not to do
- Don’t chop or chisel the ice. A University of Minnesota Extension fact sheet warns homeowners never to chop through the ice down to the shingles. Hammers, ice picks and shovels tear shingles and gutters.
- Don’t use open flames or heat guns. Blowtorches and heat guns can damage roofing, gutters and siding and can start a fire.
- Don’t use rock salt. It can damage roofing and harms plants and metal.
- Don’t climb up. Falls from roofs and ladders are the biggest danger in winter roof work.
Ice Dam Removal: DIY Options vs. Hiring a Pro
Most of what a homeowner can safely do is limited to the ground: raking snow, clearing downspouts, and managing water inside. Removing the ice itself is a different job.
| Method | Who should do it | What to know |
|---|---|---|
| Roof rake from the ground | Homeowner | Reduces meltwater; must be repeated after each snowfall; can scuff shingles if you scrape |
| Calcium chloride stocking | Homeowner only if reachable from the ground; otherwise a pro | Melts a drainage channel slowly; never use rock salt |
| Tap-water channels | Emergency stopgap | Works for days, not weeks; water can refreeze on walkways |
| Low-pressure steam | Professional | Melts ice without hammering the shingles; requires roof access and proper equipment |
| Chipping, chiseling, torches | No one | Damages roofing and creates fall and fire hazards |
Professional ice dam removal usually uses steam, which softens and cuts through the ice without the impact damage that comes from chipping. It’s slower than it sounds on a big dam, but it leaves the shingles intact.
Keep in mind that removal treats the symptom. If the attic keeps leaking heat, the dam will come back with the next snowfall.
Ice Dam Prevention: Fixing the Real Cause
Lasting ice dam prevention means keeping the whole roof deck cold, so snow doesn’t melt from below. University of Minnesota Extension lays out a clear order of work.
Step 1: Air seal the attic floor
Extension recommends air sealing the ceiling first, so warm, moist house air can’t move into the attic. Typical leak points include:
- Gaps around chimneys and flues (these need fire-safe materials and clearances)
- Plumbing vent pipes and wiring holes through the top plates of walls
- Recessed light fixtures
- Attic hatches and pull-down stairs
- Open wall cavities and soffits over cabinets
- Duct boots and leaky ductwork in the attic
A weatherization contractor can test the house with a blower door and use an infrared camera to find where heat is escaping, as Extension describes. Air sealing a tighter house also means bath fans, dryers and fuel-burning appliances must still get enough air and vent properly, so have that checked as part of the work.
Step 2: Add insulation
Once the leaks are sealed, adding attic insulation slows the heat that conducts through the ceiling. For comparison, Minnesota’s energy code that took effect in 2015 calls for R-49 ceiling insulation in new homes, and many older Minneapolis attics have far less.
Where space is tight, such as the sloped ceilings of a story-and-a-half, Extension notes that insulation with a high R-value per inch helps.
Step 3: Keep natural ventilation working
Extension says that once heat loss is reduced, roof ventilation plays a smaller role in preventing ice dams, but natural attic ventilation is still needed to dry the attic and remove summer heat. Make sure soffit vents aren’t buried by insulation (baffles help) and that air can flow to the ridge or roof vents.
Extension does not recommend powered attic fans for this. They can pull conditioned air out of the house and create moisture problems.
Step 4: Route exhaust fans outdoors
Bath and kitchen fans should vent fully to the outside, not into the attic or just through the soffit where the moist air can drift back in.
What does it cost?
The Center for Energy and Environment reports that attic air sealing and insulation projects generally run between $1,000 and $4,500, with most quotes near the middle of that range. Treat that as a ballpark; your house’s size, access and condition will drive the real number, and only a written estimate will tell you.
The same organization points Xcel Energy and CenterPoint Energy customers to the Home Energy Squad program for an in-home assessment, and suggests checking with your utility for rebates.
One more thing: snow load
Extension notes a side effect worth knowing. Once the roof stays cold, snow no longer melts off as quickly, so more of it stays on the roof. Homes built to current code should be designed for that, but if you have an older or modified roof structure, it’s worth keeping an eye on heavy accumulations.
Do Heat Cables Prevent Ice Dams?
Heat cables (also called heat tape or de-icing cables) are zigzagged along the roof edge and in gutters to melt drainage paths through the ice. They can help keep water moving in a specific trouble spot, but they don’t fix the cause.
Here’s what local experts say:
- A University of Minnesota Extension fact sheet notes that heat tape only melts ice a few inches from the cable, and that the melted pattern can lead to new ice dams above it.
- The Center for Energy and Environment recommends against heating cables as a way to eliminate or prevent ice dams, citing strain on the roof, a shorter roof life and high operating costs.
If you still consider them for a stubborn area, such as a valley over an entryway, choose a product made for roof and gutter de-icing, follow the manufacturer’s installation instructions exactly, and have the electrical work done to code. The cable must have a clear path for water to drain away, including through the gutter and downspout, or the water simply refreezes further down.
When to Call a Roofing Professional
Bring in help if any of these apply:
- Water is leaking into the house, or a ceiling is stained, bulging or dripping.
- The dam can’t be reached from the ground, or it’s over a second story.
- Gutters are sagging or pulling away from the fascia.
- You get ice dams every winter in the same places.
- Shingles, flashing or decking look damaged once the ice melts.
After the thaw, have the roof checked for lifted or cracked shingles, damaged flashing and soft decking. Our roof repair page explains what’s involved in fixing winter damage. If the roof is near the end of its life anyway, a roof replacement is the time to make sure a code-compliant ice barrier goes down along every eave. In Minneapolis, re-roofing needs a building permit, so make sure whoever does the work pulls one.
Frequently Asked Questions
Why do I get ice dams but my neighbor doesn’t?
Ice dams form when heat leaks from the house into the attic and melts roof snow from below. A neighbor with a better-sealed, better-insulated attic keeps the roof cold, so the same snow doesn’t melt and refreeze at the edge.
Are icicles a sign of an ice dam?
Not always, but large icicles are a warning sign and can signal an ice dam is forming. Look for a ridge of ice on the shingles above the gutter and for water stains on ceilings near exterior walls.
Can I use rock salt to melt an ice dam?
No. Use calcium chloride ice melt instead, because rock salt (sodium chloride) can damage roofing and harms plants. Calcium chloride in a nylon stocking can melt a drainage channel, but only place it if you can do so without climbing.
Do heat cables stop ice dams?
Heat cables only melt ice a few inches around the cable and don’t address the attic heat loss that causes ice dams. Local energy experts recommend air sealing and insulation instead, with cables at most a targeted stopgap.
How do I prevent ice dams permanently?
Air seal the attic floor first, then add insulation, and keep natural attic ventilation working. That combination keeps the roof deck cold so snow doesn’t melt from below.
Should I rake the snow off my roof to prevent ice dams?
Raking the lower few feet of the roof from the ground reduces meltwater and can help in the short term. It must be repeated after each snowfall and can scuff shingles, so it is a stopgap rather than a fix.
Ice dams are a Minneapolis winter fact of life, but they’re not inevitable. Clear the lower roof safely from the ground, deal with leaks quickly, and then fix the attic air leaks and insulation that cause the problem in the first place.
Dealing with an ice dam or winter roof leak right now? Call (888) 657-0348 for a free estimate from our Minneapolis roofing company.